DIY High Mile Tune-up 4-28-05
Hello again, people! This DIY, we'll focus on the higher mileage tune-up of your Subaru. Some of this you may know and already do, but there may be some new material.
:EDIT: July 23rd, 2007: Keep in mind, people, the Timing Belt is another High-Mileage item that NEEDS to be done, or else bad things can happen. See the DIY here.
There is more to maintenance on your Subaru than just changing the oil and replacing the battery every 5 years. There are critical items that go bad, and can effect performance, mileage, and even give you the ever-dreaded Check Engine Light. Preventative maintenance is key to longevity!
This DIY will not be written in steps, but to make it easier to browse, it will be in parts you are cleaning/replacing. Also, this is written for a 2.5L SOHC, but generally speaking, 2.0L, 2.2L, and DOHC owners can follow. Any differences I will try to point out. Hopefully, through these steps, you will learn a little more about your Sube, and maybe, a little more about yourself. Lets start with the basics:
Spark Plugs and Wires
Often overlooked, these can KILL your mileage. In a recent Subaru, SOHC, they're not bad to change. In a DOHC '98 RS, its a little tougher. If you've ever looked at it, you'll see what I mean. There are 4 wires on the top of your engine, 2 going to each side, that go into the engine. At the end of those wires, are your spark plugs.
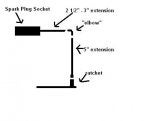
All you need to do is remove the wires from the Electronic Ignition Coil on the top of your Intake Manifold, then remove the wires from the plugs with a firm, yet gentle, pull. Next, you will need a Spark Plug removal socket, ratchet, and maybe even an extension. Take out the plugs, replace them with fresh ones, and put all new wires on. When you're doing this, be sure to replace the wires in the correct position on the Ignition Coil! Failure to do this will result in a bad firing order. If you don't know what that is, listen to an old Chevy Blazer. I change by plugs/wires every 50k-60k miles. Some plugs/wires claim to go for much higher, but you should know my.. PM! (Preventative Maintenance).
Ha! No pics needed for this one... Good luck!
Oxygen (O2) Sensor
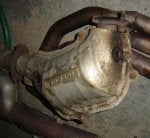
This going bad will result in some bad smelling fumes, and DEVASTATINGLY bad engine reaction. Mine went bad enough to cause Limp Mode kick on, and the car to feel like it was stalling all the time. Before you even touch your O2 sensor, let the car not run for at least 1 hour. The heat down at the pipes we will be near will burn! The oxygen sensor is located right near the headers/catalytic converter meet. (A) Yes, just so you know, there are 2 oxygen sensors.. but the rear O2 sensor, located on/right behind the catalytic converter, rarely gets touched. If you get confused on which is which, the 'Front' O2 Sensor, the one you will be changing, it closer to the front of the vehicle. Get it? This is the tricky part... Some people have put the car up on ramps and went underneath to change it, some go in through the hood to change it. I personally went underneath the car.. Reason why, its because its in a tight spot against the suspension/chassis. Whatever feels most comfortable to you. To remove it, use a special socket called an "Oxygen Sensor Removal Socket." The reason why is because it has a special slit cut in the side, so the O2 sensor wire does not get crimped or damaged. When you remove the O2 sensor, trace the wire that comes out of it up to the wire connector, and remove it, then remove the sensor, in that order. Disconnect the wire, then remove the sensor from the exhaust. Be careful not to put too much tension on these wires, however! When you install the new O2 sensor, do not plug it in beforehand! It will cause the wire to twist alot, and possible cause a wire to be pulled/snapped. Tighten the O2 sensor down till its "good and tight", reconnect the wire, and you're all set! Feel free to make some nanchakus with the old one and your buddy's old one! Hieee-YA!
This should be done every 50k miles, depending on the brand of the Oxygen Sensor installed. Some are made for longer mileage, others, shorter. Check your brands website, or just follow the basic 50k rule.
Fuel Filter
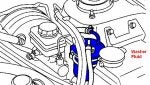
This often overlooked filter feels lonely.. it told me so in my dreams. It does its exact name: Filters fuel. If you do alot of traveling, like me, this is important to change, because in some parts of the country, there is different mixtures used in pump gas. Its being held down right in your engine bay, right next to your strut on the driver side. (B) It is highlighted in Blue to make it easy for you. Take caution!! When you remove the fuel filter, there will be fuel that comes out from the hoses! The best way I found to minimize collatoral damage from this, is to follow the hose from the fuel filter to the engine, remove it from the engine, and quickly put the hose into a soda can to catch it, instead of it pouring on you/your car. Not a whole lot will come out, but enough to make a mess. If you have never changed your fuel filter, the hoses that are on the filter are on there TIGHT. I used a pair of pliers to edge them off. If you're desperate enough, you can just trim the hose; just make sure you leave enough leftover for the job. Remove the hoses, replace with the new filter, then voila! BTW, on the filter, it clearly states which hose goes where. Obviously, the one that says "out", or some degree of that, will be the part you connect the hose that goes to the engine.
Now toss that lonely fuel filter at a responsible trash disposal facility. It has a poker game with other fuel filters at 10 tonight, and you don't want it to be late!
PCV valve
Ok.. along with the changing of your dirty, dirty oil, you should also take into consideration of your PCV valve. To be honest, I don't know the exact science of it. The only thing I know is that it gets dirty, clogged, and can effect the performance of your car in one form or another. Hey, I've no reason to lie, and I'm not gonna bullshit ya. But checking out the service manual, it can cause a rough idle, and engine stall, poor acceleration, and excessive oil consumption. The best way to tell if this part it going bad, is:
a) if you have 6 digits on the odometer, you should do it regardless of what step b is.. its a freakin maintenance item that costs freakin 5 bucks! (or something like that...)
b)Remove it, and if there is oil kinda plugging it (shake it a lil, you'll see it fly around), then change it.
One end of the PCV valve plugs into your intake manifold, on the passenger side, and the other end of the valve goes into a hose. (a). The easiest way to get it off is to remove the hose first, that way you don't twist it when you unscrew the PCV valve's threaded end. When you are removing it, if it is too tough, you can either try cleaning your engine (there is a DIY written on making it all nice and shiny!), or you can use some P.B. Blaster. Just be careful that the engine isn't hot, and when you are done with the installation, hose yer engine down. P.B. Blaster (the fumes more or less) can catch fire if exposed to high heat. Install the new PCV valve, and when you do, there is no real need to use any sort of "thread-lock" on the threaded end. Just make sure that the hose on the opposing end has a nice and secure fit. I can't find torue specs in the manual, but just make till its 'good n tight'. Thats what I did in my DOHC RS, and it served no problems.
V-Belt Changing
ugh... if there's one thing that I hate happening in the middle of driving on the highway, its one of your V-Belts going bad! There are 2 of them: The one that extends from the driver's side takes care of the air conditioning compressor, and the one that extends to the passenger side runs the alternator and power steering. The air compressor one, I know people who run their cars without it; you just won't have AC. The other one, if that goes shot in the middle of driving.. well, lets just hope it doesn't happen to you. Thats why you're here, right?")
First off, is the almighty inspection of the belts. Remove the cover of the belts, then take a good look at the outside of the belts, then the inside. The outside won't tell too much, but if its to the point where the writing from the factory/manufacturer is worn off, its time to remove them. Another way to tell, and the best way, is the inside. If the belts are starting to crack, or the ribs on the inside are worn, broken in any form or fashion, then keep reading. Also, another general time people change them is when their belts are squeaking.
Start by loosening up the tensioner for your alternator belt. That belt is the one that goes to the left from the crankshaft. (belts A) Remove the belt when it is good and loose. If it still feels tight, push DOWN on the alternator. Voila! Should go down, loose enough to pull the belt. Next, Loosen the tensioner for the air conditioning compressor. (belts B) Pull that belt off as well.
Now, when you put the belts on, you put them on and tighten them in the opposite order you put them on, nothing special. Start with the AC belt, then the other one. Why? As you noticed, the AC belt sits behind the other one on the crank pulley!
Also, when you put the belts back on, if you choose to, you can put belt dressing on. Which will also stop some squeaking if that was your original issue. Why didn't I say that before you changed them? If you read this while changing them, you probably want to kick my ass, because you would've done that instead of changing them. But if you're unsure when the last time they were replaced, then kick yourself in the ass for wanting to shortcut your vehicle. Ha! Boo-yah!
Thanks for the idea on other things to add in here, guys.. Keep the ideas rollin! Oh yeah, because of the limit for attachments for pictures, look through the thread for any posts with pictures you may be looking for. I'll try to keep things organized as best I can.
Hello again, people! This DIY, we'll focus on the higher mileage tune-up of your Subaru. Some of this you may know and already do, but there may be some new material.
:EDIT: July 23rd, 2007: Keep in mind, people, the Timing Belt is another High-Mileage item that NEEDS to be done, or else bad things can happen. See the DIY here.
There is more to maintenance on your Subaru than just changing the oil and replacing the battery every 5 years. There are critical items that go bad, and can effect performance, mileage, and even give you the ever-dreaded Check Engine Light. Preventative maintenance is key to longevity!
This DIY will not be written in steps, but to make it easier to browse, it will be in parts you are cleaning/replacing. Also, this is written for a 2.5L SOHC, but generally speaking, 2.0L, 2.2L, and DOHC owners can follow. Any differences I will try to point out. Hopefully, through these steps, you will learn a little more about your Sube, and maybe, a little more about yourself. Lets start with the basics:
Spark Plugs and Wires
Often overlooked, these can KILL your mileage. In a recent Subaru, SOHC, they're not bad to change. In a DOHC '98 RS, its a little tougher. If you've ever looked at it, you'll see what I mean. There are 4 wires on the top of your engine, 2 going to each side, that go into the engine. At the end of those wires, are your spark plugs.
All you need to do is remove the wires from the Electronic Ignition Coil on the top of your Intake Manifold, then remove the wires from the plugs with a firm, yet gentle, pull. Next, you will need a Spark Plug removal socket, ratchet, and maybe even an extension. Take out the plugs, replace them with fresh ones, and put all new wires on. When you're doing this, be sure to replace the wires in the correct position on the Ignition Coil! Failure to do this will result in a bad firing order. If you don't know what that is, listen to an old Chevy Blazer. I change by plugs/wires every 50k-60k miles. Some plugs/wires claim to go for much higher, but you should know my.. PM! (Preventative Maintenance).
Ha! No pics needed for this one... Good luck!
Oxygen (O2) Sensor
This going bad will result in some bad smelling fumes, and DEVASTATINGLY bad engine reaction. Mine went bad enough to cause Limp Mode kick on, and the car to feel like it was stalling all the time. Before you even touch your O2 sensor, let the car not run for at least 1 hour. The heat down at the pipes we will be near will burn! The oxygen sensor is located right near the headers/catalytic converter meet. (A) Yes, just so you know, there are 2 oxygen sensors.. but the rear O2 sensor, located on/right behind the catalytic converter, rarely gets touched. If you get confused on which is which, the 'Front' O2 Sensor, the one you will be changing, it closer to the front of the vehicle. Get it? This is the tricky part... Some people have put the car up on ramps and went underneath to change it, some go in through the hood to change it. I personally went underneath the car.. Reason why, its because its in a tight spot against the suspension/chassis. Whatever feels most comfortable to you. To remove it, use a special socket called an "Oxygen Sensor Removal Socket." The reason why is because it has a special slit cut in the side, so the O2 sensor wire does not get crimped or damaged. When you remove the O2 sensor, trace the wire that comes out of it up to the wire connector, and remove it, then remove the sensor, in that order. Disconnect the wire, then remove the sensor from the exhaust. Be careful not to put too much tension on these wires, however! When you install the new O2 sensor, do not plug it in beforehand! It will cause the wire to twist alot, and possible cause a wire to be pulled/snapped. Tighten the O2 sensor down till its "good and tight", reconnect the wire, and you're all set! Feel free to make some nanchakus with the old one and your buddy's old one! Hieee-YA!
This should be done every 50k miles, depending on the brand of the Oxygen Sensor installed. Some are made for longer mileage, others, shorter. Check your brands website, or just follow the basic 50k rule.
Fuel Filter
This often overlooked filter feels lonely.. it told me so in my dreams. It does its exact name: Filters fuel. If you do alot of traveling, like me, this is important to change, because in some parts of the country, there is different mixtures used in pump gas. Its being held down right in your engine bay, right next to your strut on the driver side. (B) It is highlighted in Blue to make it easy for you. Take caution!! When you remove the fuel filter, there will be fuel that comes out from the hoses! The best way I found to minimize collatoral damage from this, is to follow the hose from the fuel filter to the engine, remove it from the engine, and quickly put the hose into a soda can to catch it, instead of it pouring on you/your car. Not a whole lot will come out, but enough to make a mess. If you have never changed your fuel filter, the hoses that are on the filter are on there TIGHT. I used a pair of pliers to edge them off. If you're desperate enough, you can just trim the hose; just make sure you leave enough leftover for the job. Remove the hoses, replace with the new filter, then voila! BTW, on the filter, it clearly states which hose goes where. Obviously, the one that says "out", or some degree of that, will be the part you connect the hose that goes to the engine.
Now toss that lonely fuel filter at a responsible trash disposal facility. It has a poker game with other fuel filters at 10 tonight, and you don't want it to be late!
PCV valve
Ok.. along with the changing of your dirty, dirty oil, you should also take into consideration of your PCV valve. To be honest, I don't know the exact science of it. The only thing I know is that it gets dirty, clogged, and can effect the performance of your car in one form or another. Hey, I've no reason to lie, and I'm not gonna bullshit ya. But checking out the service manual, it can cause a rough idle, and engine stall, poor acceleration, and excessive oil consumption. The best way to tell if this part it going bad, is:
a) if you have 6 digits on the odometer, you should do it regardless of what step b is.. its a freakin maintenance item that costs freakin 5 bucks! (or something like that...)
b)Remove it, and if there is oil kinda plugging it (shake it a lil, you'll see it fly around), then change it.
One end of the PCV valve plugs into your intake manifold, on the passenger side, and the other end of the valve goes into a hose. (a). The easiest way to get it off is to remove the hose first, that way you don't twist it when you unscrew the PCV valve's threaded end. When you are removing it, if it is too tough, you can either try cleaning your engine (there is a DIY written on making it all nice and shiny!), or you can use some P.B. Blaster. Just be careful that the engine isn't hot, and when you are done with the installation, hose yer engine down. P.B. Blaster (the fumes more or less) can catch fire if exposed to high heat. Install the new PCV valve, and when you do, there is no real need to use any sort of "thread-lock" on the threaded end. Just make sure that the hose on the opposing end has a nice and secure fit. I can't find torue specs in the manual, but just make till its 'good n tight'. Thats what I did in my DOHC RS, and it served no problems.
V-Belt Changing
ugh... if there's one thing that I hate happening in the middle of driving on the highway, its one of your V-Belts going bad! There are 2 of them: The one that extends from the driver's side takes care of the air conditioning compressor, and the one that extends to the passenger side runs the alternator and power steering. The air compressor one, I know people who run their cars without it; you just won't have AC. The other one, if that goes shot in the middle of driving.. well, lets just hope it doesn't happen to you. Thats why you're here, right?
First off, is the almighty inspection of the belts. Remove the cover of the belts, then take a good look at the outside of the belts, then the inside. The outside won't tell too much, but if its to the point where the writing from the factory/manufacturer is worn off, its time to remove them. Another way to tell, and the best way, is the inside. If the belts are starting to crack, or the ribs on the inside are worn, broken in any form or fashion, then keep reading. Also, another general time people change them is when their belts are squeaking.
Start by loosening up the tensioner for your alternator belt. That belt is the one that goes to the left from the crankshaft. (belts A) Remove the belt when it is good and loose. If it still feels tight, push DOWN on the alternator. Voila! Should go down, loose enough to pull the belt. Next, Loosen the tensioner for the air conditioning compressor. (belts B) Pull that belt off as well.
Now, when you put the belts on, you put them on and tighten them in the opposite order you put them on, nothing special. Start with the AC belt, then the other one. Why? As you noticed, the AC belt sits behind the other one on the crank pulley!
Also, when you put the belts back on, if you choose to, you can put belt dressing on. Which will also stop some squeaking if that was your original issue. Why didn't I say that before you changed them? If you read this while changing them, you probably want to kick my ass, because you would've done that instead of changing them. But if you're unsure when the last time they were replaced, then kick yourself in the ass for wanting to shortcut your vehicle. Ha! Boo-yah!
Thanks for the idea on other things to add in here, guys.. Keep the ideas rollin! Oh yeah, because of the limit for attachments for pictures, look through the thread for any posts with pictures you may be looking for. I'll try to keep things organized as best I can.