

So, it's never be too late to buy a GC chassis Subaru and if your mileage is going high and it's time to replace those timing belts! Subaru recommends timing belt to be changed every 75k miles and changing idler gear/pullies and tensioner won't be a bad idea either. I did this on my 2001 2.5rs MT and it was fairly easy task.
There are a few timing belt DIY around but I'm adding some photos in there so it can clarify some mechanically-challenged owners.
Tools
- 1/2 and 3/8 ratcheting wrenches
- 10mm, 12mm, 14mm, 17mm, and 22mm sockets
- Breaker bar + extension
- small c-clamp
- Nose plier
- PB Blaster or WD-40
- Gloves and goggles for safety
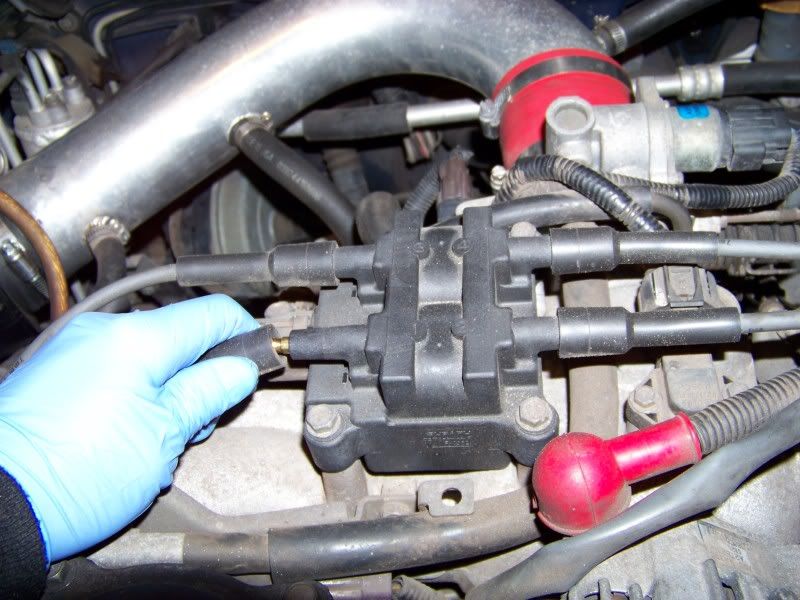
Unplug Spark Plug wires
- Remove the 4 spark plug wires toward the top. Just pull them firmly gripping the end and they will pop out. This is crucial for bumping the crank bolt loose.
![Image]()
Removing the radiator fans
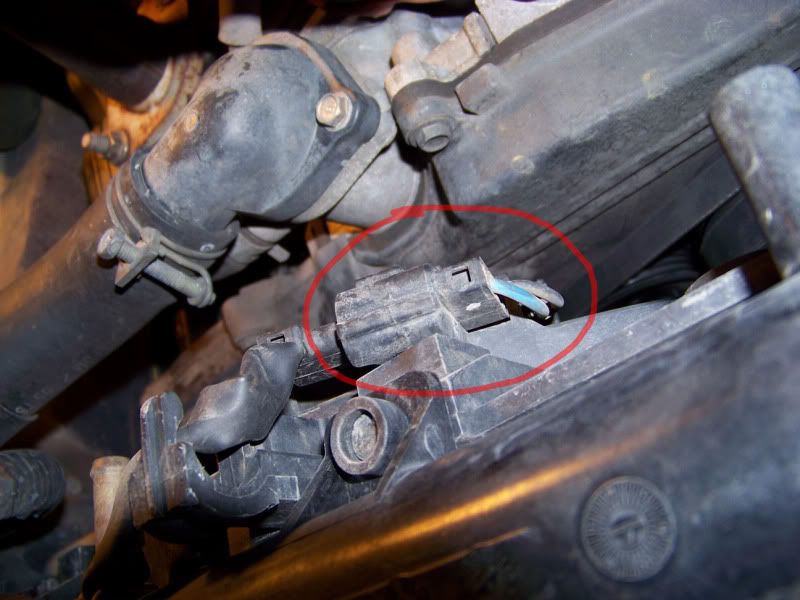
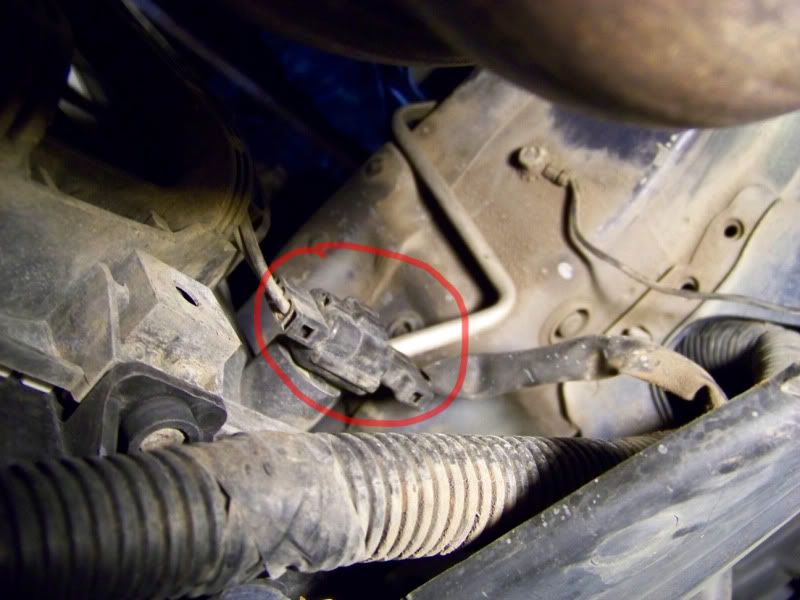
- Start by going under the car and unplug the radiator fan connectors. There's 1 per fan. Simply lift up little tab and pull it to remove.
![Image]()
![Image]()
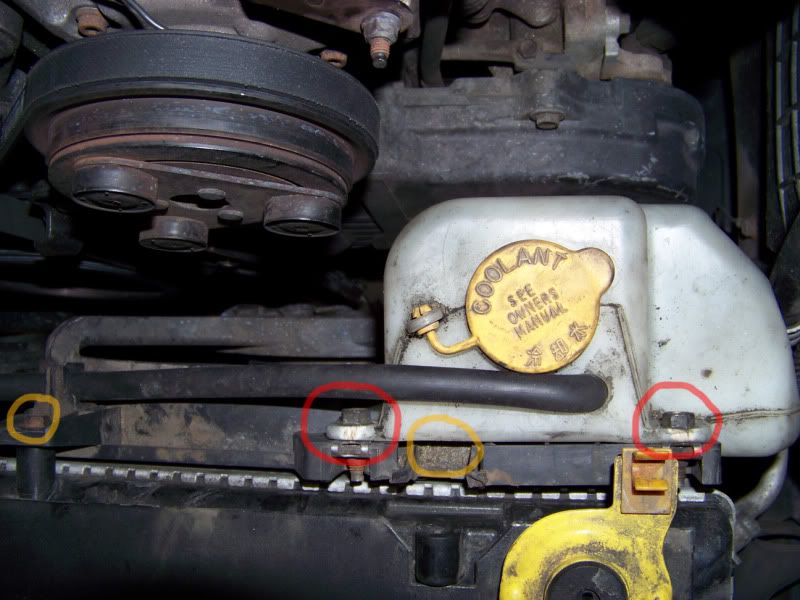
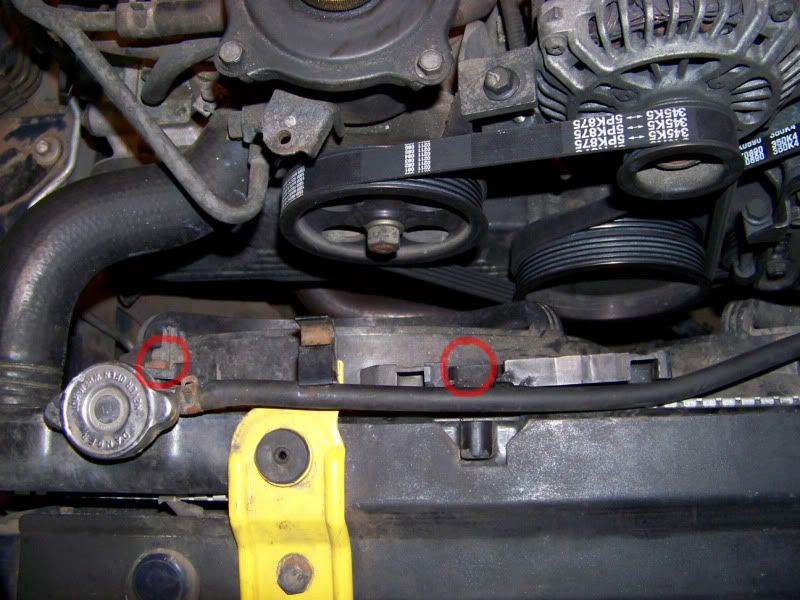
- Now that the fans are disconnected, remove the coolant reservoir by removing the 2 10mm bolts (red) and simply lift it up.
- Remove the 2 10mm bolts securing the fan (orange) and lift up to remove the driver side fan.
![Image]()
- Remove the 2 10mm bolts on the passenger side fan and lift up to take it out.
![Image]()
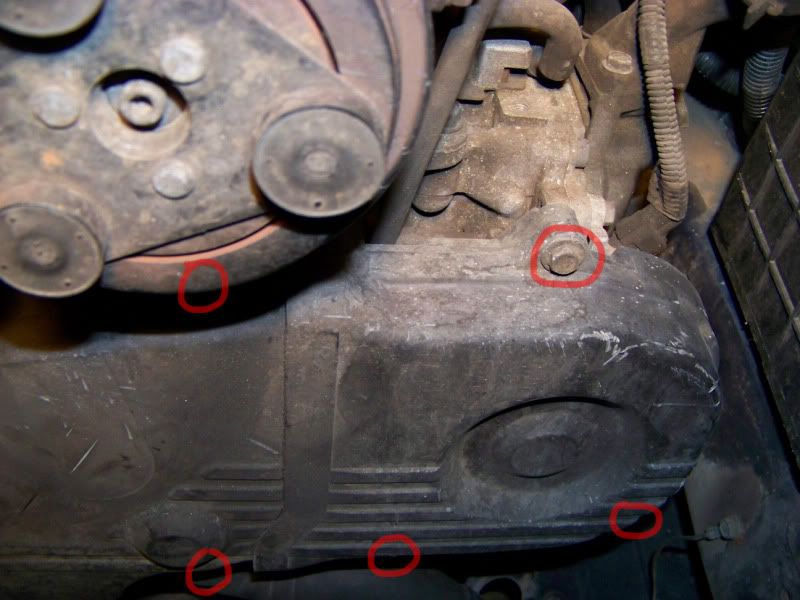
Removing the Alternator belt
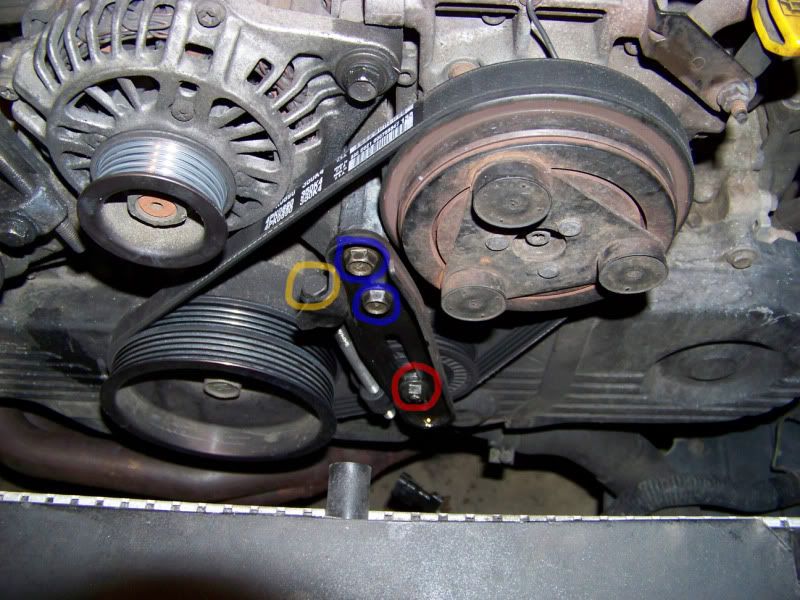
- Start by loosening (do NOT remove) the 12mm bolts (red) on the alternator and on the tensioner. Loosen them enough to be able to spin them by hand.
- Loosen the 12mm Tensioner bolt (orange). As you loosen this bolt, you can push down the alternator, giving the belt enough slack to remove.
![Image]()
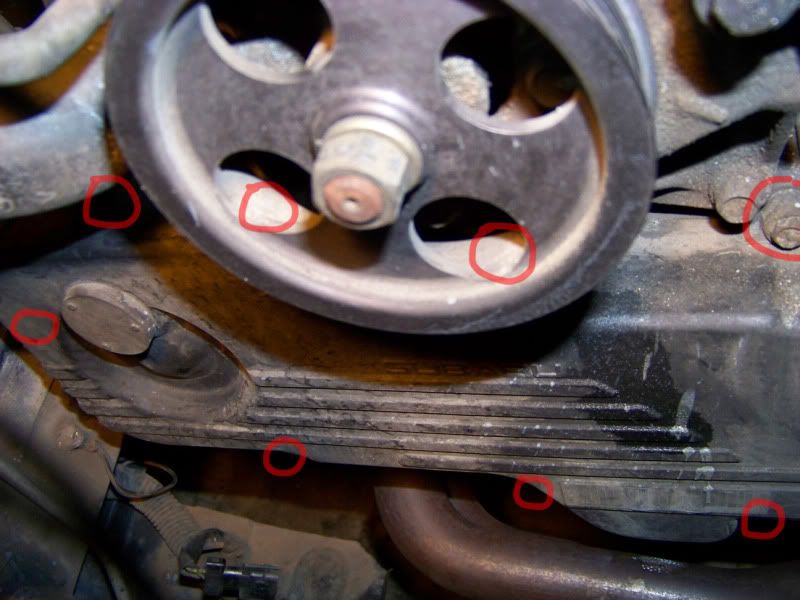
Remove the A/C belt
- Start by loosening the idle pulley 12mm (red)
- Loosen the 12mm tensioner bolt (orange) so it relieves the tension on the belt.
- Finally, remove the 2 12mm bolts (blue).
![Image]()
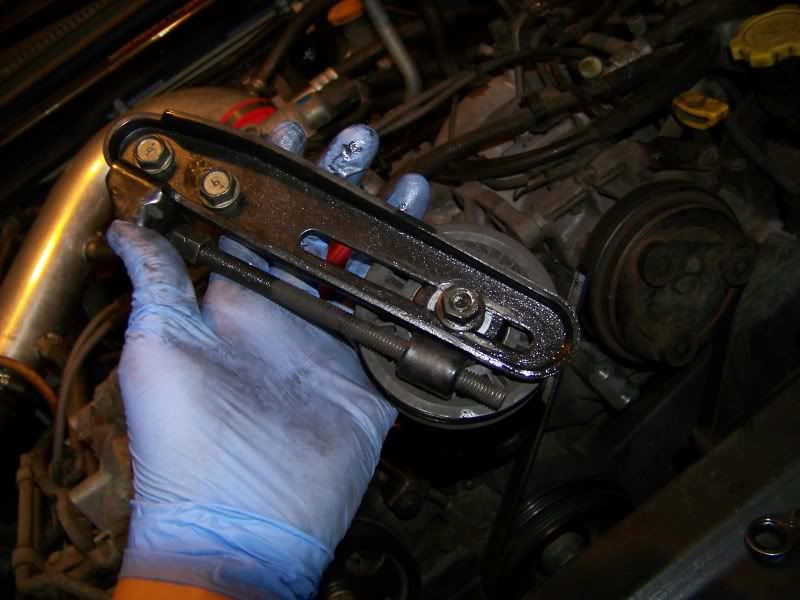
- Remove the tensioner assembly.
![Image]()
- Remove the a/c belt.
Remove the Crank pulley
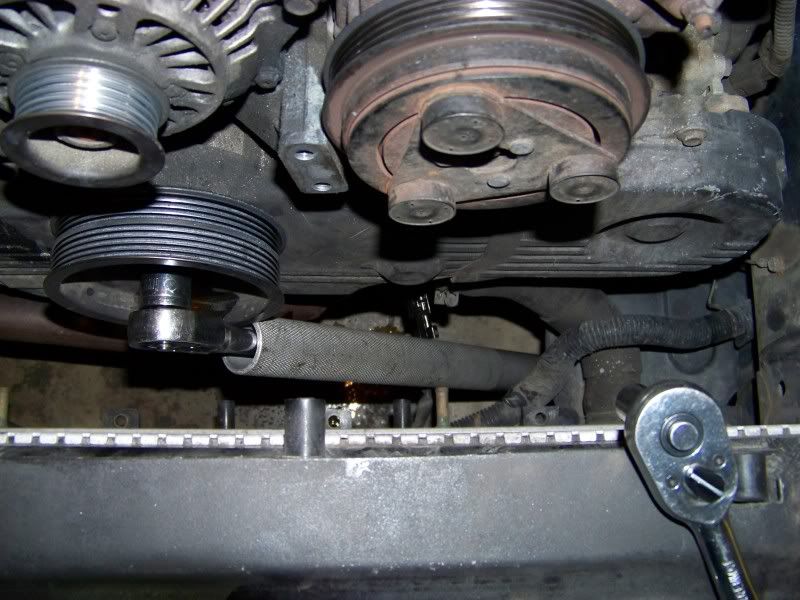
- This part is quite easy. Just place a 22mm socket on your trusty 1/2" ratcher or a breaker bar, find a long enough pipe or extension (mine was a floor jack handle) and rest it on DRIVER'S SIDE ground.
![Image]()
- Sit in the car, then crank your engine. It should come off on the first try. If not, try it again.
- Once it's loose, remove the crank bolt and remove the crank pulley.
*EDIT*
This is just one of many way to remove the crank bolt. I personally had no problem using this method since I don't have any air tools or impact wrenches. Due to popular demand, here's the link to another way to remove the bolt
http://www.rs25.com/forums/f105/t113885-better-way-remove-your-crank-pulley.html
Remove the Timing belt covers
- This 2 piece plastic timing belt cover is held on by 13 10mm bolts (3 on driver's side, 10 on passenger's side). They can all be reached from the engine bay and remove the driver's side first.
![Image]()
- Continue to the Passenger side and remove the cover.
![Image]()
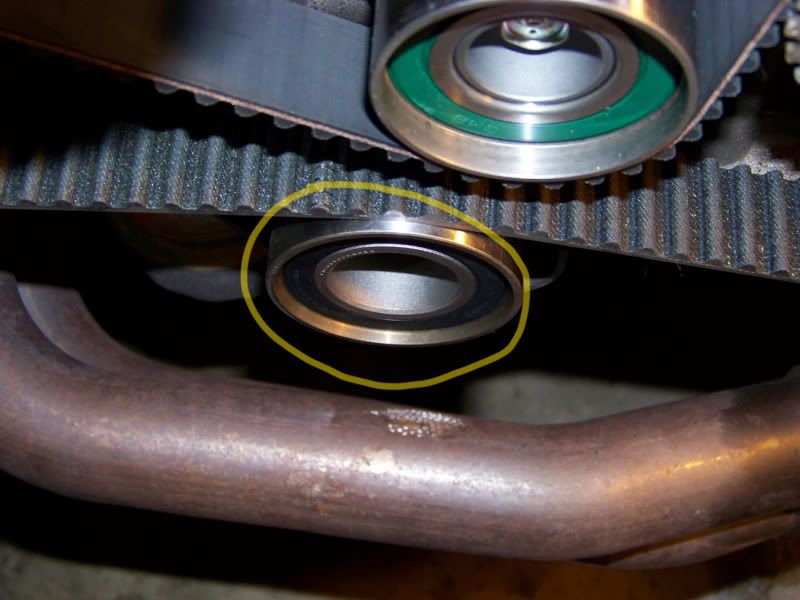
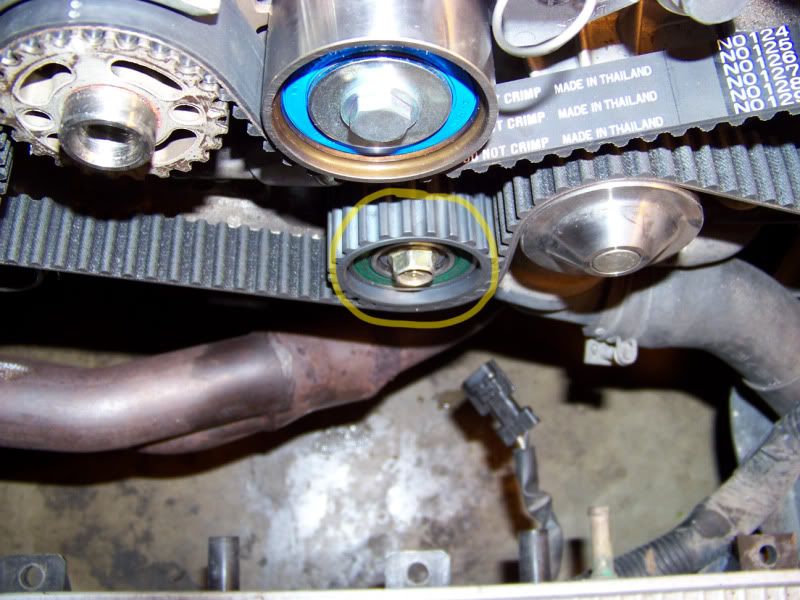
Remove the idler gear and pulley
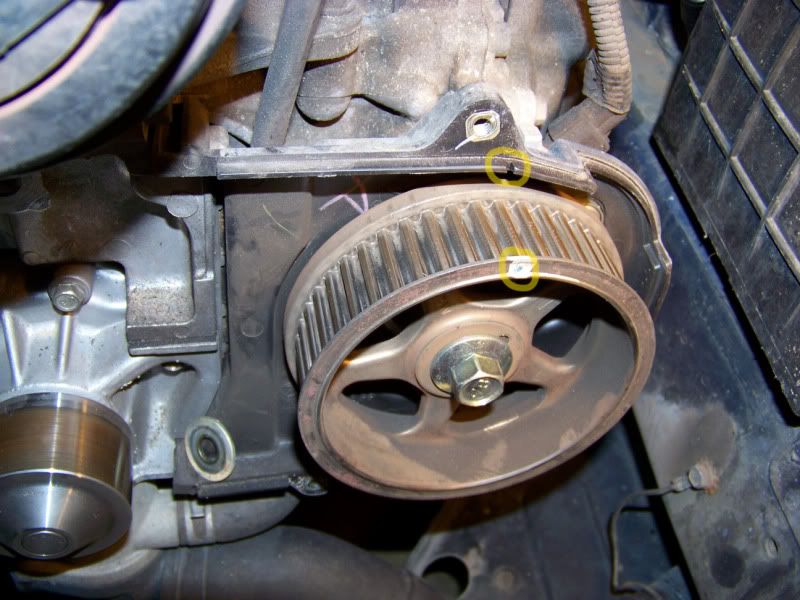
- Remove the lower left idler pulley by removing the 14mm bolt first to gain some slacks.
![Image]()
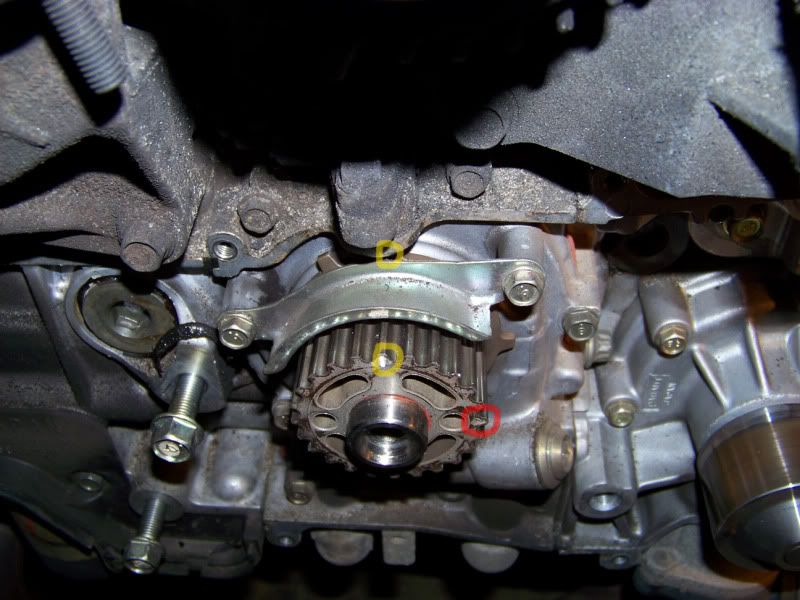
- Then, remove the idler gear by removing the 14mm bolt on the center.
![Image]()
Remove the tensioner
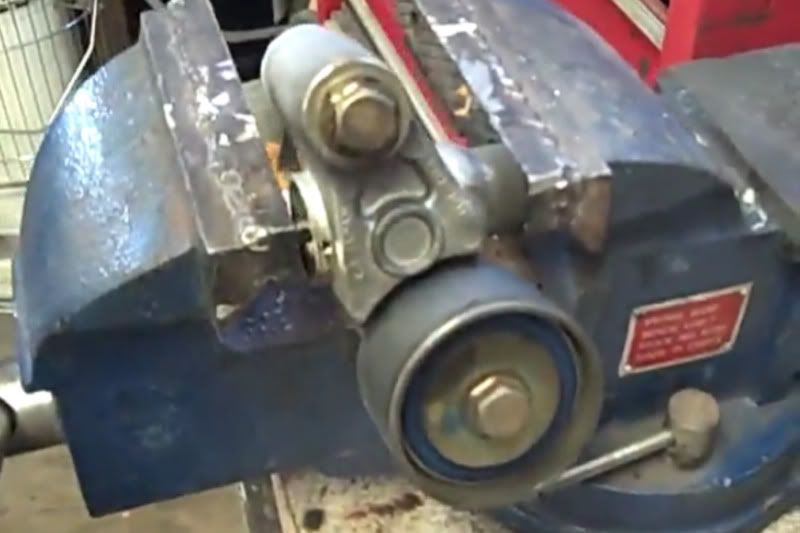
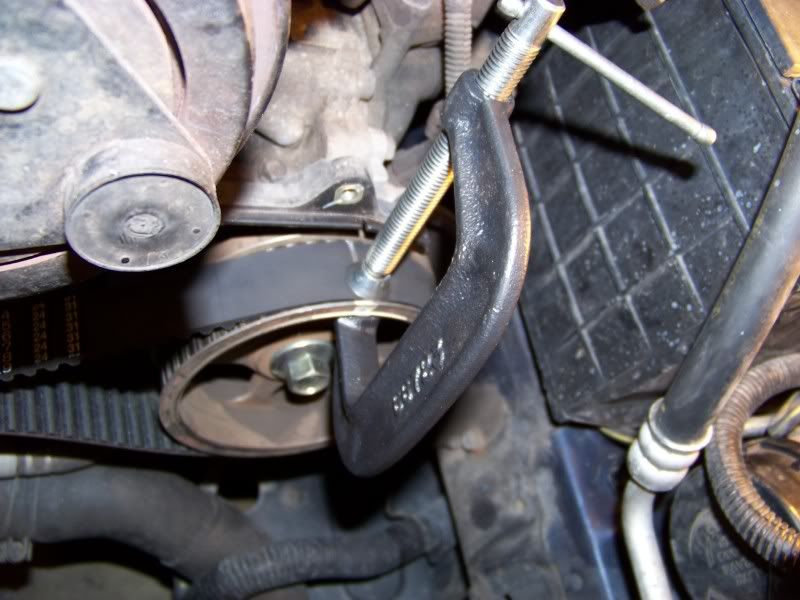
- Remove the tensioner by removing the 14mm bolt.
- If you're planning on reusing the tensioner, you must compress the tensioner's hydraulic thingi. You can use a c clamp, or a table vise. Just remember to compress it slowly or it may damage the hydraulics. Compress the tensioner enough so you can insert a small nail, pin, or 2mm allen wrench to hold the tension.
![Image]()
- Once the tensioner is out, remove the old belt.
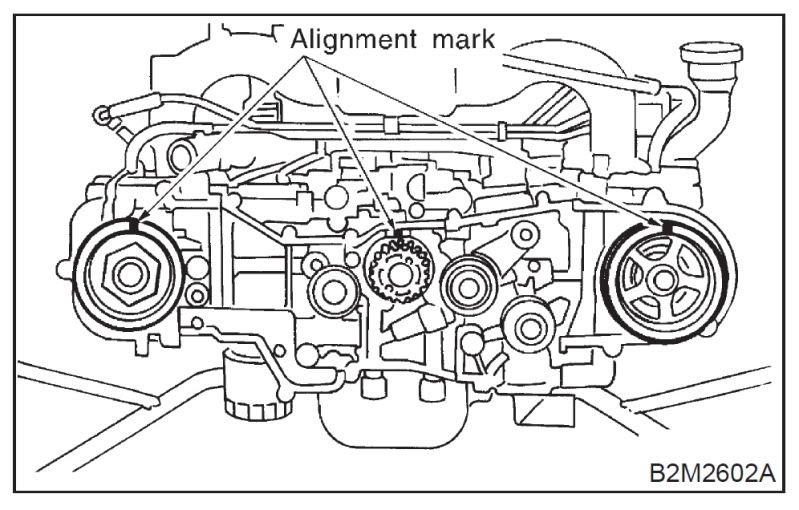
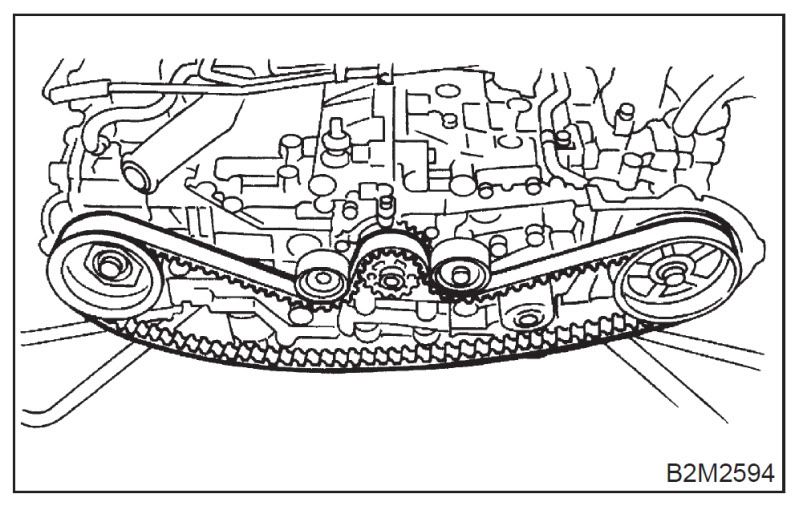
Line up the Cam positions
- On SOHC engines, the aligning the timing mark is quite easy. All you need to do is to line up 3 markings. Period.
![Image]()
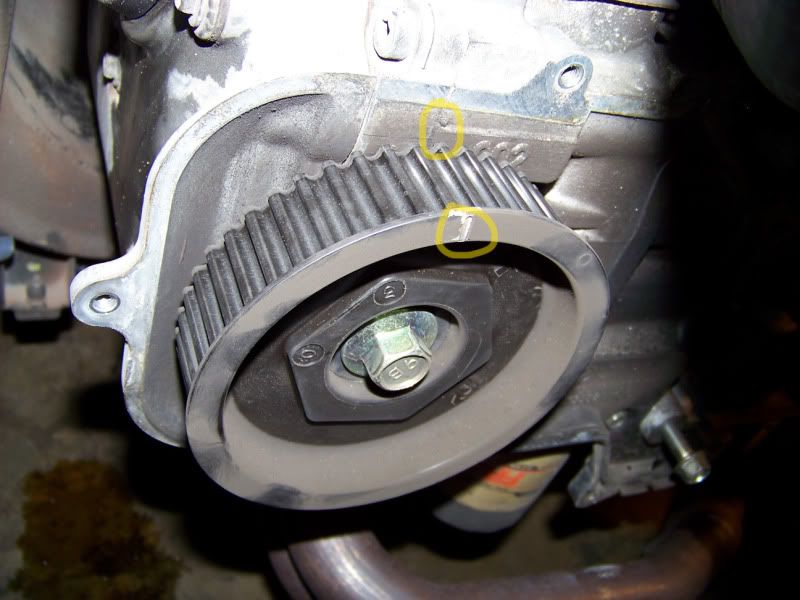
- First, line up the crank cam. There's a difference between a timing mark yellow) and the arrow (red). Line up the marking as shown.
![Image]()
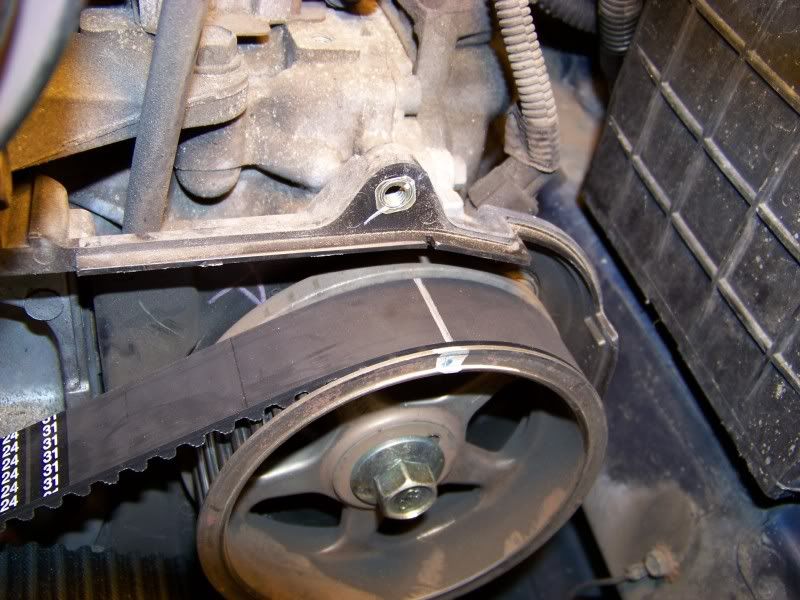
- Next, line up the driver's side cam. Use 17mm socket wrench to turn the cam and align the marking. *This can be tricky because when the timing mark get closely align, you'll be fighting compression so you'll have to use some force turning the gear. Don't use brute force! or it'll pass the timing mark and you'll have to turn it again.
![Image]()
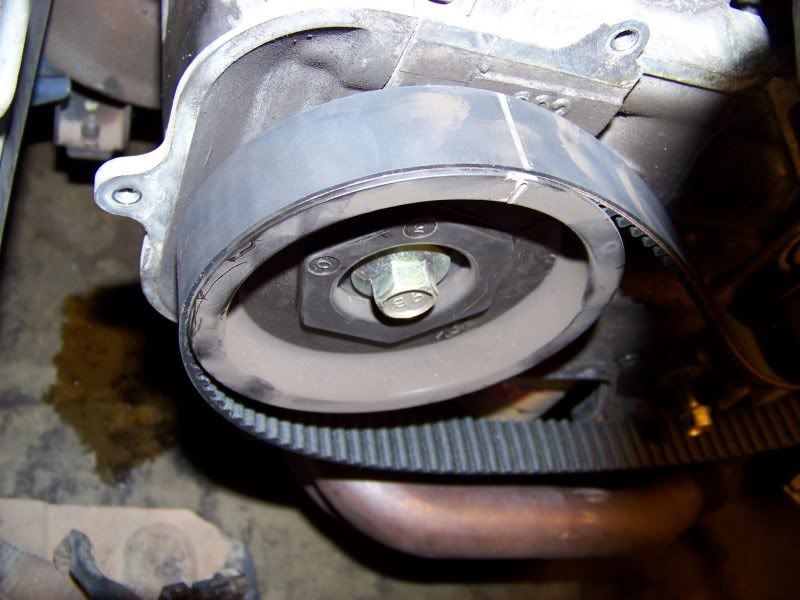
- Finally, line up the passenger side's cam. This one is easy. Just like the driver's side, use 17mm socket wrench to turn and align it to the proper marking.
![Image]()
Install the new timing belt
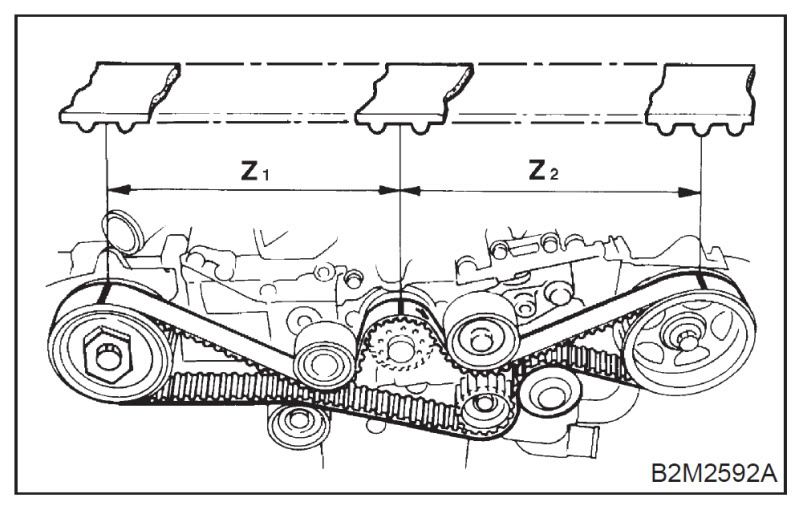
- I use the OEM Mitsuboshi timing belt and it came with TDC (top dead center) marking and other 2 timing mark. In most cases, the new timing belts will have markings already printed.
- On the FSM, teeth counts were supposed to be 44/40.5 tooth between the cams, but mine were 44/47 tooth. Just go by the markings on the belt and you'll be fine.
- Start by reinstalling the Tensioner assembly first. Install the 14mm bolt and tighten it to 39±4 N·m (4.0±0.4kg-m, 28.9±2.9ft-lb).
- Line up the Crank first.
![Image]()
- Next, the driver's side.
![Image]()
- Finally the passenger side
![Image]()
- Let the belt sit as shown.
![Image]()
- Since the driver's cam is quite unstable, I used a small c clamp to hold its belt location so I don't lose my alignment. Don't clamp it too hard or you'll damage your new belt!
![Image]()
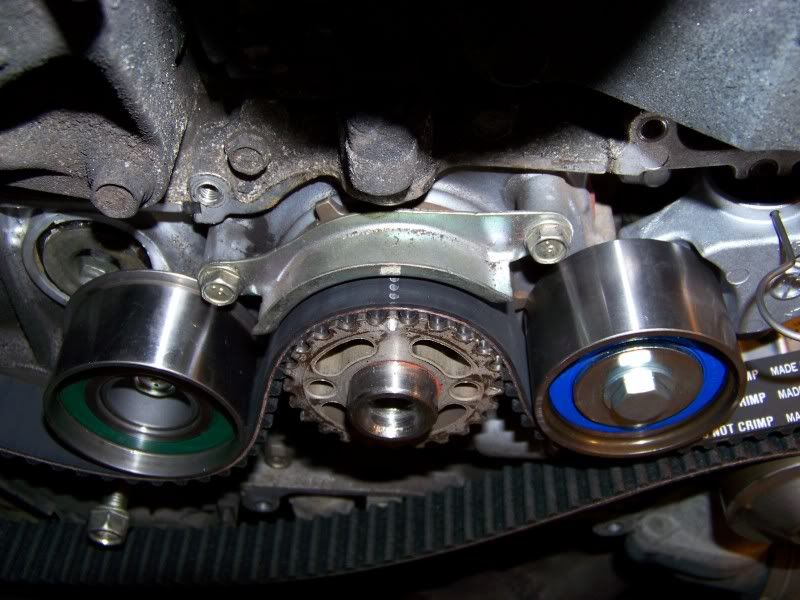
- Install the gear idler pulley and tighten it to 39±4 N·m (4.0±0.4 kg-m, 28.9±2.9 ft-lb).
![Image]()
- Install the smooth idler pulley and tighten it to 39±4 N·m (4.0±0.4 kg-m, 28.9±2.9 ft-lb).
![Image]()
- MAKE SURE the belt is still aligned to the timing belt before proceeding to the next step or you may have to start all over again!
![Image]()
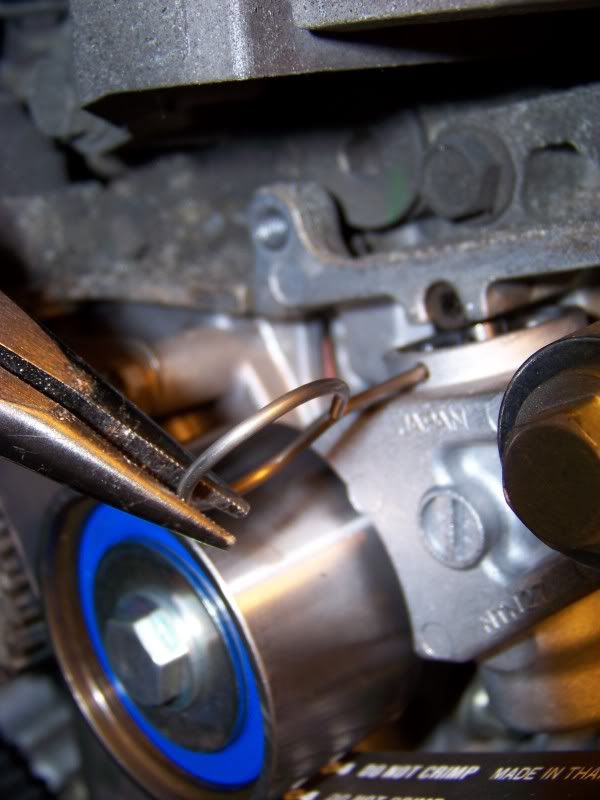
- Now for the final step. Grab a nose plier and remove that grenade pin. Once the pin is removed, the hydraulic will kick in and tighten the belt.
![Image]()
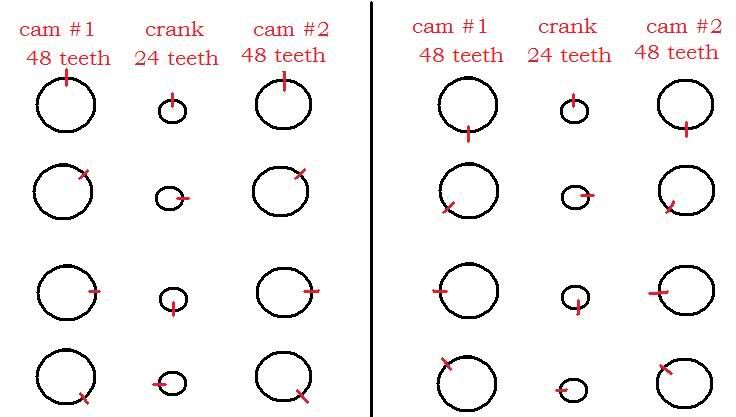
- Now, use the 17mm socket wrench to turn the gears around. You'll be fighting the compression so you'll have to use some force turning the belt around. Since the crank cam 24 teeth gear opposed to driver/passenger 48 teeth gear, the marking should align every 2 revolutions. Keep turning the belt around to see consistence in timing alignment.
![Image]()
- When everything looks good, pat yourself in the back for a good job and reinstall everything in reverse order. Fire up the car and you're set for another 75k miles!
Disclaimer
I am not responsible if you mess up your car by reading this DIY. I'm posting this DIY for references and some insights on this tedious install. If unsure about installing, please consult a professional Subaru mechanic.
There are a few timing belt DIY around but I'm adding some photos in there so it can clarify some mechanically-challenged owners.
Tools
- 1/2 and 3/8 ratcheting wrenches
- 10mm, 12mm, 14mm, 17mm, and 22mm sockets
- Breaker bar + extension
- small c-clamp
- Nose plier
- PB Blaster or WD-40
- Gloves and goggles for safety
Unplug Spark Plug wires
- Remove the 4 spark plug wires toward the top. Just pull them firmly gripping the end and they will pop out. This is crucial for bumping the crank bolt loose.
Removing the radiator fans
- Start by going under the car and unplug the radiator fan connectors. There's 1 per fan. Simply lift up little tab and pull it to remove.
- Now that the fans are disconnected, remove the coolant reservoir by removing the 2 10mm bolts (red) and simply lift it up.
- Remove the 2 10mm bolts securing the fan (orange) and lift up to remove the driver side fan.
- Remove the 2 10mm bolts on the passenger side fan and lift up to take it out.
Removing the Alternator belt
- Start by loosening (do NOT remove) the 12mm bolts (red) on the alternator and on the tensioner. Loosen them enough to be able to spin them by hand.
- Loosen the 12mm Tensioner bolt (orange). As you loosen this bolt, you can push down the alternator, giving the belt enough slack to remove.

Remove the A/C belt
- Start by loosening the idle pulley 12mm (red)
- Loosen the 12mm tensioner bolt (orange) so it relieves the tension on the belt.
- Finally, remove the 2 12mm bolts (blue).
- Remove the tensioner assembly.
- Remove the a/c belt.
Remove the Crank pulley
- This part is quite easy. Just place a 22mm socket on your trusty 1/2" ratcher or a breaker bar, find a long enough pipe or extension (mine was a floor jack handle) and rest it on DRIVER'S SIDE ground.
- Sit in the car, then crank your engine. It should come off on the first try. If not, try it again.
- Once it's loose, remove the crank bolt and remove the crank pulley.
*EDIT*
This is just one of many way to remove the crank bolt. I personally had no problem using this method since I don't have any air tools or impact wrenches. Due to popular demand, here's the link to another way to remove the bolt
http://www.rs25.com/forums/f105/t113885-better-way-remove-your-crank-pulley.html
Remove the Timing belt covers
- This 2 piece plastic timing belt cover is held on by 13 10mm bolts (3 on driver's side, 10 on passenger's side). They can all be reached from the engine bay and remove the driver's side first.
- Continue to the Passenger side and remove the cover.
Remove the idler gear and pulley
- Remove the lower left idler pulley by removing the 14mm bolt first to gain some slacks.
- Then, remove the idler gear by removing the 14mm bolt on the center.
Remove the tensioner
- Remove the tensioner by removing the 14mm bolt.
- If you're planning on reusing the tensioner, you must compress the tensioner's hydraulic thingi. You can use a c clamp, or a table vise. Just remember to compress it slowly or it may damage the hydraulics. Compress the tensioner enough so you can insert a small nail, pin, or 2mm allen wrench to hold the tension.
- Once the tensioner is out, remove the old belt.
Line up the Cam positions
- On SOHC engines, the aligning the timing mark is quite easy. All you need to do is to line up 3 markings. Period.
- First, line up the crank cam. There's a difference between a timing mark yellow) and the arrow (red). Line up the marking as shown.
- Next, line up the driver's side cam. Use 17mm socket wrench to turn the cam and align the marking. *This can be tricky because when the timing mark get closely align, you'll be fighting compression so you'll have to use some force turning the gear. Don't use brute force! or it'll pass the timing mark and you'll have to turn it again.
- Finally, line up the passenger side's cam. This one is easy. Just like the driver's side, use 17mm socket wrench to turn and align it to the proper marking.
Install the new timing belt
- I use the OEM Mitsuboshi timing belt and it came with TDC (top dead center) marking and other 2 timing mark. In most cases, the new timing belts will have markings already printed.
- On the FSM, teeth counts were supposed to be 44/40.5 tooth between the cams, but mine were 44/47 tooth. Just go by the markings on the belt and you'll be fine.
- Start by reinstalling the Tensioner assembly first. Install the 14mm bolt and tighten it to 39±4 N·m (4.0±0.4kg-m, 28.9±2.9ft-lb).
- Line up the Crank first.
- Next, the driver's side.
- Finally the passenger side
- Let the belt sit as shown.
- Since the driver's cam is quite unstable, I used a small c clamp to hold its belt location so I don't lose my alignment. Don't clamp it too hard or you'll damage your new belt!
- Install the gear idler pulley and tighten it to 39±4 N·m (4.0±0.4 kg-m, 28.9±2.9 ft-lb).
- Install the smooth idler pulley and tighten it to 39±4 N·m (4.0±0.4 kg-m, 28.9±2.9 ft-lb).
- MAKE SURE the belt is still aligned to the timing belt before proceeding to the next step or you may have to start all over again!
- Now for the final step. Grab a nose plier and remove that grenade pin. Once the pin is removed, the hydraulic will kick in and tighten the belt.
- Now, use the 17mm socket wrench to turn the gears around. You'll be fighting the compression so you'll have to use some force turning the belt around. Since the crank cam 24 teeth gear opposed to driver/passenger 48 teeth gear, the marking should align every 2 revolutions. Keep turning the belt around to see consistence in timing alignment.
- When everything looks good, pat yourself in the back for a good job and reinstall everything in reverse order. Fire up the car and you're set for another 75k miles!
Disclaimer
I am not responsible if you mess up your car by reading this DIY. I'm posting this DIY for references and some insights on this tedious install. If unsure about installing, please consult a professional Subaru mechanic.


