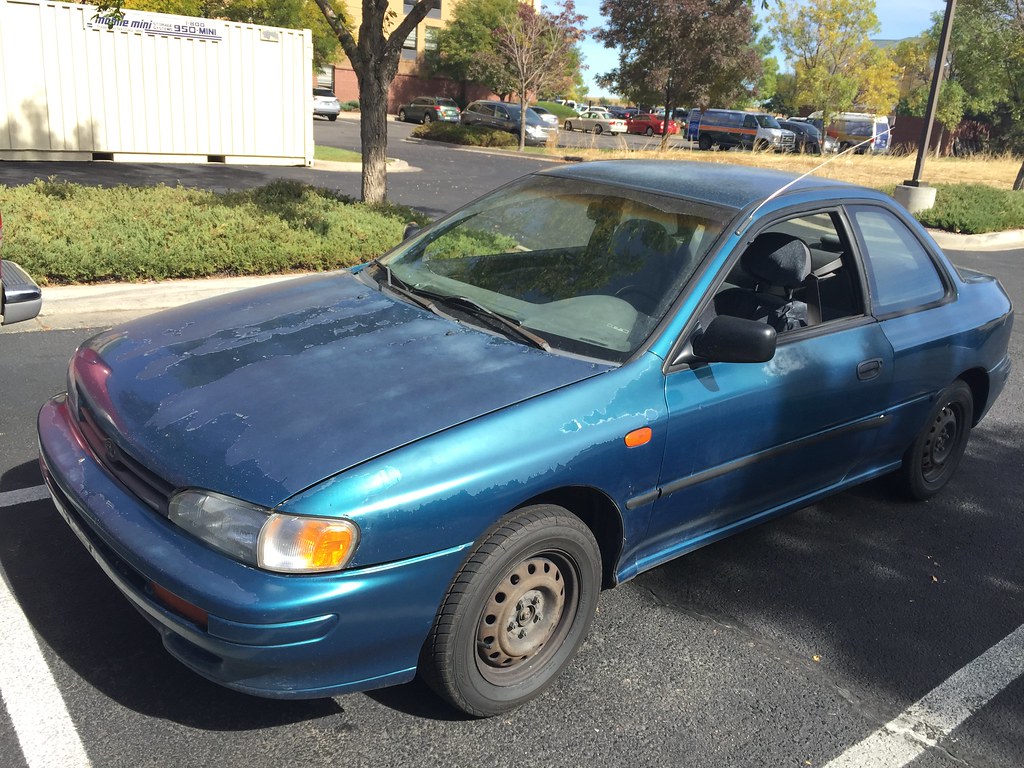
The next phase for my car is a Aegean Blue 96 Impreza L Coupe. I have swapped shells over from my 95L getting ready for the carbon Aerosim kit(I couldn't bring myself to install the carbon kit on a salvaged title car).Picture of the 1996 L coupe the day I bought it.
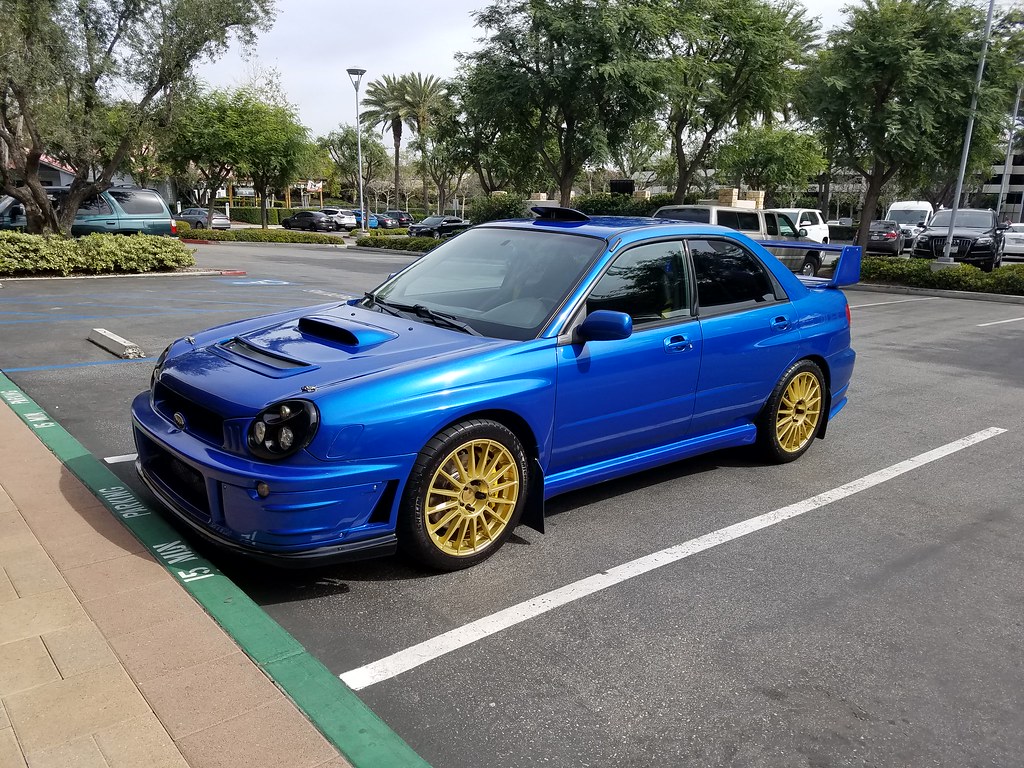
Current picture:

Current mods are:
Exterior:
Aerosim Research Full Carbon Fiber WRC Body Kit
-Molded Quarters and Side Skirts
-Rally Pin Jack Stand Bosses in The Rocker Panels
Newton Equipment Locking Aero Fuel Filler Cap
JDM Version 5/6 STi Aluminum Hood
Replica S5 WRC Hood Vents
Version 4 EDM Fluted Headlights with Beam Leveling Motors
JDM Light Weight Rear Bumper Beam
JDM Clear Corners with Amber LEDs
JDM STi Tail Lights
JDM STi Type RA Roof Vent
WRC Replica Roof Scoop - Primitive racing(trimmed shorter and contoured to the roof)
Hella Super Tone Horns
Bakemono Adjustable 22B Replica Spoiler
Bakemono S201 Carbon Fiber Aero Pocket Mirrors
Sparco Hood Pins
Sabelt Front Tow Strap (Red)
WRC Front Grille Subaru Stars Badge Holder
World Rally Blue Paint (Paint code 02C)
-PPG Primer
-Sherwin Williams Basecoat
-DuPont Imron Clearcoat
Interior:
99 RS Dash, Door Cards and all Black Trim Plastics
JDM Version 8 STi Gauge Cluster
EDM LHD Passenger Airbag Delete Pocket
USDM 05 STi Rear Seats
Genuine Recaro/Blimp SRD seats
06 WRX Black Carpet
22B Nardi Steering Wheel(with working auto canceling signals and working horn)
22B Stainless Door Sills
06 STi Pedal Box
08+ Legacy STi Pedal Set
STi Titanium Sphere Shift knob (6MT)
OEM Trunk Light (converted to LED)
Version 6 STi Trunk Springs
04 STi Red Stitched Leather E-brake handle
STi Limited WRC Edition Blue Center Console (#425 of 2000)
02 WRX 6 Disc Changer Radio
-Converted to Red Back Light
-Jazzy Engineering AUX in module
Passenger Vinyl Sun Visor without Airbag Warning from 93 (Impreza L base)
2002 WRX Intermittent Wiper Stalk
Autopower Roll Bar
Sabelt 6 Point Harness
Engine:
2005 JDM STi Spec C EJ207(version 8) with working AVCS
Version 7 Spec C VF-34 Turbo (Larger P20 Exhaust housing swap from a VF-22)
05 USDM STi UEL Headers
APS Up-Pipe
ID1050x Top Feed injectors
Cobb 4 Bar Map Sensor
iWire Harness Merge #109
Tomioka Racing Timing Belt Guide
Gates Blue Timing Belt Kit.
Killer B Oil Pickup
MFactory Oil Cooler
MoCal Oil Cooler Thermostat
Mishimoto 1st Gen Legacy Turbo Aluminum Radiator
GReddy GC8 Radiator Shroud
Zero/Sports 1.3 BAR Radiator Cap
Custom Carbon Fiber Radiator Brackets
98 RS Style Custom Carbon Fiber Fan Shrouds(allows stock fans clear the thicker Rad, aftermarket slim fans suck!)
JDM In Fender Coolant Expansion Tank
07 WRX Fuel Tank
AEM 320LPH Fuel Pump (E85 Safe)
K&N Typhoon Short Ram Intake
-Carbon Fiber Heatshield
AP Racing Hard Turbo Inlet (too hard to find an APS
 )
)TurboXS V2 3" Downpipe & Catless Test Pipe
TurboXS 3" Stealthback Midpipe
Prodrive Round Tip Axleback Exhaust (2.5")
Prodrive 3-Port Boost Solenoid
Prodrive Oil Cap
Prodrive Battery Tie Down
Cusco Catch Can
Innovate Motorsports ECF-1 Ethanol Content Analyzer (Flexfuel)
Carberry ROM (Tuned By Paul at YimiSport Tuning)
Suspension:
Fuji Heavy Industries Aerospace Carbon Front Strut Tower Bar
02 WRX Rear Subframe
07 STi Front Subframe
07 STi Steering Rack
Unabomber's Sexy Rear End:
-Kartboy Rear Subframe Lock Bolts
-Kartboy Diff Outrigger bushings(race)
-Whiteline Rear Diff Bushings
05 STi Aluminum Lateral Links
05 STi Aluminum Front Control Arms
98 Forester ALK Housings
Ohlins Rear Camber Plates
Ohlins Front Camber Plates
5x114.3 STi Ohlins DFV Coilovers
Eibach/Ohlins Spec 7kgf/mm Front Springs
Eibach/Ohlins Spec 5kgf/mm Rear Springs
Whiteline 27mm Adj. Front Sway Bar (Adjusted to 29mm)
Whiteline 24mm Adj. Rear Sway Bar (Adjusted to 22mm)
Whiteline Caster Adding ALK Bushings
Whiteline Roll Center Adjustment Kit (RCA)
Turn in Concepts Rear Trailing Arm Bushings
Powerflex Front Trailing arm Bushings
Powerflex Lateral Link Bushings
Perrin Spherical Bearing Front Endlinks F&R
Superpro Front Control Arm Front Bushings
Alignment Specs By: West End Alignment
-3.2 Degrees Front Camber
+6.5 Degrees Caster
-2.4 Degrees Rear Camber
0 Toe all around
Wheels & Tires:
Magnesium Aston Martin Racing Superturismo (by OZ racing/Prodrive) 18x10+45
-22 LBS
Falken Azeni RT615k+ in 275/35/18
ARP Extended Studs
Muteki Open Ended Lugs - Matte Black
1/2" spacers to clear the struts
Brakes
05 STi 1 1/16th inch Master Cylinder
05 STi Brake Booster
Grimmspeed Master Cylinder Brace
01 RS ABS System
"Prodrive" BBK
- Porsche Cayenne S 6 Pot Brembo Calipers (Machined & custom adapter bracket to fit Subaru Knuckle)
- Mercedes Benz GL450 Powerslot Rotors (350mm x 32mm)
Speed Bleeder Screws x8
Goodridge SS Brake Lines F&R
Hawk DTC-60 Pads
Drive Train:
JDM Version 8 STi DCCD 6MT
Exedy OEM Replacement Clutch Kit
Carbonetic Lightweight Flywheel
JDM Version 8 STi R-180 Rear Diff
06 STi Drive Shaft
06 STi 5x114.3 hubs
05 STi Axles
DCCDPro Deluxe DCCD Controller(manual/Auto mode with STi switches and STi Cluster interface)
Kartboy Rear Shifter Bushing