

This is a DIY 4EAT Automatic Transmission Fluid (ATF) flush that that I used to do on my old '97 Volvo 850 (R.I.P.). One of the bigger Volvo suppliers had a kit that you could buy along with a set of instructions, but once you knew the concept, it wasn't very hard to come up with a low-buck DIY solution. I've done this several times on the Volvo with spectacular results.
Once I got my Subaru up and running, I knew I wanted to flush out the ATF. I also knew I didn't want to pay over a hundred dollars for some unknown oil shop knucklehead to hook the car up to a machine and pump in some mystery fluids, so I decided to look into the Subaru transmission to see if the Volvo trick was applicable.
The basic concept is that since the 4EAT is just a big hydraulic pump, it can do most of the work for you. Simply intercept the ATF at some external point (on the way to the ATF oil cooler in the Volvo's case) and divert it into a collection container rather than letting it return to the transmission.
After a specified volume is collected, you add the EXACT same amount of brand new fluid back into the transmission via the dipstick. The transmission has a bit of a buffer in the amount of fluid that's contained in the sump, so the idea is to stay within that buffer by extracting and adding carefully measured amounts.
Since the 4EAT equipped Subaru's have an external oil cooler, you have your built in "intercept point". This was the key to the whole process - the trick should work!
It should be noted that there is some debate/controversy over whether or not a service like this should be done to high mileage cars with old/neglected ATF. The issue being that if you remove the old fluid, you may disrupt the fine balance that had been keeping everything working properly. The introduction of new fluid dislodges all kinds of gunk and particles that can make their way to the valve body and start wreaking havoc.
So if you've got more than 100k on the clock and have never paid any attention to the trans, or if the ATF is any color but red(ish), you may want to think twice about doing something like this. If on the other hand, you've been good about maintenance, this is a quick, inexpensive way to do a complete flush.
Here's what you'll need:
Collection jug(s) - at least 12 quarts total capacity
-clear containers are preferred so that you can easily monitor fluid levels
10 ft 3/8" ID clear tubing
3/8" rubber plugs or caps (2-4 should be fine)
Drain pan
ATF funnel
12-14 quarts of your favorite ATF
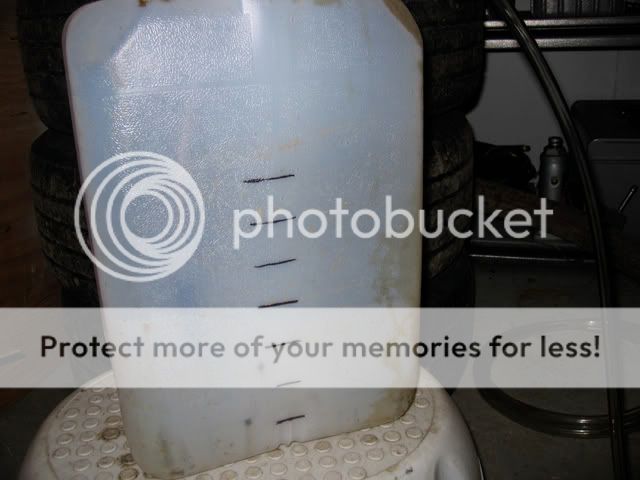
1. Prepare your Collection Bucket or Gallon Jugs and tubing
I used an old 5 gallon oil jug that I keep my waste oil in. I simply emptied it and marked it in 2 quart increments to keep track of the expelled fluid.
![Image]()
This is VERY IMPORTANT! If you don't keep track of how much fluid has come out of the transmission, you can't accurately add the same amount. Automatic transmissions are pretty finicky, and it would be a very bad idea to run it with too little, or too much ATF for very long. So, whatever bucket or jugs you decide to use, be sure to mark them in 1 or 2 quart increments to measure the quantity of fluid you are exchanging.
Be sure to have some shop rags on hand as you will inevitably spill some ATF in the process.
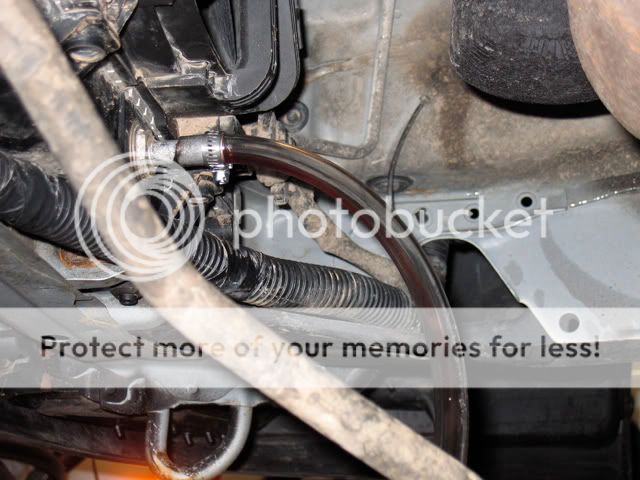
2. Disconnect the Transmission Line at the Radiator
Crawl under the front of the car and look up at the bottom of the radiator - you'll see two rubber hoses running to either side of the radiator - these are the transmission oil cooler inlet and outlet. Driver's side is the inlet from the transmission, and the passenger side is the outlet back to the transmission.
![Image]()
You can realistically hook into either line, but I chose the oil cooler outlet (passenger side) since it would require less hardware, and present less chance of contact with blazing hot transmission fluid since it just went through the "cooler". Still, be careful as you work - the fluid can still be pretty warm. Disconnect the return line from the cooler outlet by removing the hose clamp and pulling the hose. Have a plug handy and cram it into the end of the return line. Make sure your plug is pretty robust, and that it's a good fit because there's going to be a bit of vacuum on this line once you start the car.
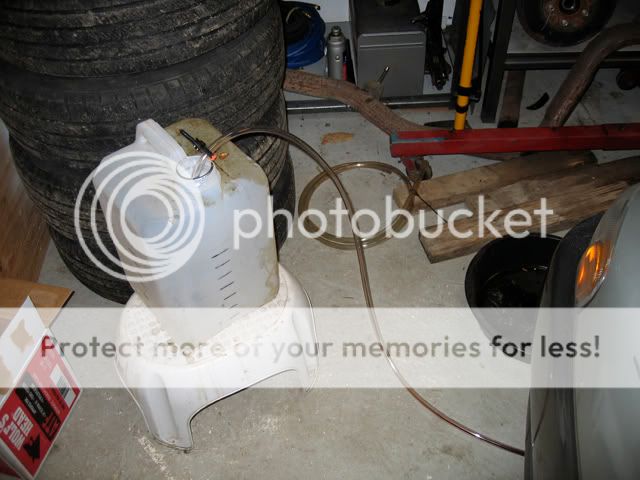
3. Attach the Flush Hose to the Transmission Line
Slip the clear 3/8 ID hose onto the metal cooler outlet, secure it with a hose clamp, and route it to your chosen container for collecting the expelled ATF.
![Image]()
![Image]()
The clear hose will help you to monitor the color of the fluid as you replace the old fluid with the new.
4. Start Flushing!
NOTE: When I did this in my old Volvo, I let it run until 2 quarts was expelled each time. I was hesitant to do the same with the Subaru since I wasn't sure if it would tolerate losing 2 quarts, so I played it safe and only did one quart at a time. Further research seems to indicate that losing two quarts would probably be ok, but my instructions will be for the 1 quart method.
Remove the transmission dipstick and securely place your funnel into the dipstick tube. I found that adding a length of the 3/8 hosing to the end of the funnel gave me a better connection to the dipstick tube.
![Image]()
Check your routing of the clear flush hose to your collection container. If possible, have an assistant hold the hose and collection container. Apply the parking brake (car in park) and start the engine. You should see the fluid start to run through the clear hose and into your container. At idle, the ATF will pump out at a rate of about 1 quart per 30-45 seconds. Do NOT rev the engine to speed up the process.
Turn the ignition off when you have expelled 1 quart from the transmission. Then slowly add a quart of fresh ATF through the dipstick tube funnel. Repeat this process 12 times for a total flush of 12 quarts. You should see bright red ATF after flushing out 10-11 quarts, if not, you might need to do it one more time using 2 more quarts (for a total of 14 quarts used).
I also like to make a "vial" of new ATF to compare to the old fluid as I'm flushing. Just snip a 3" length of clear tubing, plug one end and fill with fresh ATF, plug the other end and leave it near your flush hose for comparison.
![Image]()
5. Re-attaching the Transmission Line to the Radiator
Disconnect the clear flush hose from the transmission line. Remove the plug from the return line, and plug it back into the oil cooler. Tighten up all hardware and check for any static leaks. Wipe up any spilled fluid and prepare the used fluid for proper recycling.
6. Checking Fluid Level / Test Drive
To properly check the fluid level, the ATF should be at operating temperature as the fluid expands quite a bit when hot. Ideally, if the level was correct before your flush procedure, and you added as much as you removed, it will be close to where it was before.
Start the car and let it idle as you check over your work and make sure ATF isn't gushing out onto your floor. Now go for a gentle 10-15 mile drive, stop the car on a flat level surface, apply the brake and move the shift lever slowly from Park, through all the gears and back to Park. With the engine running at idle, re-check the fluid level and adjust as necessary. If you've driven like a normal person, you should get a pretty good measurement. If you drove like a jackass on the test drive, or if it is extremely hot outside, you may not get an accurate reading until the car has cooled off for 30 minutes.
7. Clean-up and final thoughts
Allow the clear flush hose to drain as much as possible, and store it in a plastic zip-lock bag for future use. Note in your records the date and mileage of the fluid change. You might also want to make a similar note somewhere in the engine compartment with a permanent felt tip marker. It is probably a good idea to change the ATF approx. every 20-30K miles.
That's it - happy motoring!
Once I got my Subaru up and running, I knew I wanted to flush out the ATF. I also knew I didn't want to pay over a hundred dollars for some unknown oil shop knucklehead to hook the car up to a machine and pump in some mystery fluids, so I decided to look into the Subaru transmission to see if the Volvo trick was applicable.
The basic concept is that since the 4EAT is just a big hydraulic pump, it can do most of the work for you. Simply intercept the ATF at some external point (on the way to the ATF oil cooler in the Volvo's case) and divert it into a collection container rather than letting it return to the transmission.
After a specified volume is collected, you add the EXACT same amount of brand new fluid back into the transmission via the dipstick. The transmission has a bit of a buffer in the amount of fluid that's contained in the sump, so the idea is to stay within that buffer by extracting and adding carefully measured amounts.
Since the 4EAT equipped Subaru's have an external oil cooler, you have your built in "intercept point". This was the key to the whole process - the trick should work!
It should be noted that there is some debate/controversy over whether or not a service like this should be done to high mileage cars with old/neglected ATF. The issue being that if you remove the old fluid, you may disrupt the fine balance that had been keeping everything working properly. The introduction of new fluid dislodges all kinds of gunk and particles that can make their way to the valve body and start wreaking havoc.
So if you've got more than 100k on the clock and have never paid any attention to the trans, or if the ATF is any color but red(ish), you may want to think twice about doing something like this. If on the other hand, you've been good about maintenance, this is a quick, inexpensive way to do a complete flush.
Here's what you'll need:
Collection jug(s) - at least 12 quarts total capacity
-clear containers are preferred so that you can easily monitor fluid levels
10 ft 3/8" ID clear tubing
3/8" rubber plugs or caps (2-4 should be fine)
Drain pan
ATF funnel
12-14 quarts of your favorite ATF
1. Prepare your Collection Bucket or Gallon Jugs and tubing
I used an old 5 gallon oil jug that I keep my waste oil in. I simply emptied it and marked it in 2 quart increments to keep track of the expelled fluid.
This is VERY IMPORTANT! If you don't keep track of how much fluid has come out of the transmission, you can't accurately add the same amount. Automatic transmissions are pretty finicky, and it would be a very bad idea to run it with too little, or too much ATF for very long. So, whatever bucket or jugs you decide to use, be sure to mark them in 1 or 2 quart increments to measure the quantity of fluid you are exchanging.
Be sure to have some shop rags on hand as you will inevitably spill some ATF in the process.
2. Disconnect the Transmission Line at the Radiator
Crawl under the front of the car and look up at the bottom of the radiator - you'll see two rubber hoses running to either side of the radiator - these are the transmission oil cooler inlet and outlet. Driver's side is the inlet from the transmission, and the passenger side is the outlet back to the transmission.

You can realistically hook into either line, but I chose the oil cooler outlet (passenger side) since it would require less hardware, and present less chance of contact with blazing hot transmission fluid since it just went through the "cooler". Still, be careful as you work - the fluid can still be pretty warm. Disconnect the return line from the cooler outlet by removing the hose clamp and pulling the hose. Have a plug handy and cram it into the end of the return line. Make sure your plug is pretty robust, and that it's a good fit because there's going to be a bit of vacuum on this line once you start the car.
3. Attach the Flush Hose to the Transmission Line
Slip the clear 3/8 ID hose onto the metal cooler outlet, secure it with a hose clamp, and route it to your chosen container for collecting the expelled ATF.
The clear hose will help you to monitor the color of the fluid as you replace the old fluid with the new.
4. Start Flushing!
NOTE: When I did this in my old Volvo, I let it run until 2 quarts was expelled each time. I was hesitant to do the same with the Subaru since I wasn't sure if it would tolerate losing 2 quarts, so I played it safe and only did one quart at a time. Further research seems to indicate that losing two quarts would probably be ok, but my instructions will be for the 1 quart method.
Remove the transmission dipstick and securely place your funnel into the dipstick tube. I found that adding a length of the 3/8 hosing to the end of the funnel gave me a better connection to the dipstick tube.

Check your routing of the clear flush hose to your collection container. If possible, have an assistant hold the hose and collection container. Apply the parking brake (car in park) and start the engine. You should see the fluid start to run through the clear hose and into your container. At idle, the ATF will pump out at a rate of about 1 quart per 30-45 seconds. Do NOT rev the engine to speed up the process.
Turn the ignition off when you have expelled 1 quart from the transmission. Then slowly add a quart of fresh ATF through the dipstick tube funnel. Repeat this process 12 times for a total flush of 12 quarts. You should see bright red ATF after flushing out 10-11 quarts, if not, you might need to do it one more time using 2 more quarts (for a total of 14 quarts used).
I also like to make a "vial" of new ATF to compare to the old fluid as I'm flushing. Just snip a 3" length of clear tubing, plug one end and fill with fresh ATF, plug the other end and leave it near your flush hose for comparison.

5. Re-attaching the Transmission Line to the Radiator
Disconnect the clear flush hose from the transmission line. Remove the plug from the return line, and plug it back into the oil cooler. Tighten up all hardware and check for any static leaks. Wipe up any spilled fluid and prepare the used fluid for proper recycling.
6. Checking Fluid Level / Test Drive
To properly check the fluid level, the ATF should be at operating temperature as the fluid expands quite a bit when hot. Ideally, if the level was correct before your flush procedure, and you added as much as you removed, it will be close to where it was before.
Start the car and let it idle as you check over your work and make sure ATF isn't gushing out onto your floor. Now go for a gentle 10-15 mile drive, stop the car on a flat level surface, apply the brake and move the shift lever slowly from Park, through all the gears and back to Park. With the engine running at idle, re-check the fluid level and adjust as necessary. If you've driven like a normal person, you should get a pretty good measurement. If you drove like a jackass on the test drive, or if it is extremely hot outside, you may not get an accurate reading until the car has cooled off for 30 minutes.
7. Clean-up and final thoughts
Allow the clear flush hose to drain as much as possible, and store it in a plastic zip-lock bag for future use. Note in your records the date and mileage of the fluid change. You might also want to make a similar note somewhere in the engine compartment with a permanent felt tip marker. It is probably a good idea to change the ATF approx. every 20-30K miles.
That's it - happy motoring!


